Showing posts with label restoration. Show all posts

Tuesday, December 18, 2012

The Rewards of a Closer Look

Ed's Refurbished Miyata
There are bicycles that strike you as unique from the first glance, and then there are those that sneak up on you. When Ed showed me the rando bike he'd put together from a refurbished Miyata frameset, it seemed like a nice enough classic build. Fenders, racks, leather, twine. But on closer inspection, all sorts of curious features emerged.

Ed's Refurbished Miyata
First I noticed the unusual front rack mount. A small DIY bracket at the front curled under and bolted onto the fender. 

Ed's Refurbished Miyata
Initially I assumed this was to add extra stability to the rack. But then I realised the real function of this bracket - in addition to another one extending from the fork crown - was to hold up the fender. Or, more accurately, the front part of the fender. 

Ed's Refurbished Miyata
I had seen split fenders before, but what struck me about these was how subtle they were, how utterly integrated into the overall design of the bike. The split was something I noticed only after my eye led me to it as it moved from one end of the rack to the other. 

Ed's Refurbished Miyata
The tires are 700Cx28mm Gran Compe ENE Ciclo (brown, with tan sidewalls) and Ed was determined to make them fit along with the fenders. The split accomplishes this despite the lack of sufficient clearances under the brake bridge and fork crown. 

Ed's Refurbished Miyata
Both the front and rear racks were recycled from older bikes, and I noticed that the rear one was stamped "Jim Blackburn." This prompted me to look into the history of Blackburn Racks, and indeed they were once called by the name of the founder. The vintage racks - now quite sought after - used a single bracket design to connect to the brake bridge, whereas the Blackburns in current production use a two bracket design to connect to seat stay braze-ons. I also found an interesting article describing Jim Blackburn's contributions to research in weight distribution for loaded touring.

Ed's Refurbished Miyata
The components seemed like a random mix, until Ed explained that he was going for a Suntour-inspired build: mostly vintage Japanese (but no Shimano), with some modern VO and Dia Compe sprinkled in. While such a thing would never have occurred to me, gathering components that made sense within this paradigm had been an important part of putting the bike together, a game he'd enjoyed playing.

Ed's Refurbished Miyata
The more we talked about the bike, the more of these things I discovered. Subtle details, hidden meanings. What looked like "just" a nice bicycle at first glance became fascinatingly personal. And that's the thing about bikes. We don't really know what they mean, or represent to the owner. We don't know what the story behind each one is, until we ask. Maybe that's why I still can't seem to walk past a bicycle without a closer look, or at least a second glance. 

Tuesday, June 12, 2012

Children's Bicycle Revamped

Children's Bike Customised by Tomii Cycles
Visiting Nao of Tomii Cycles this morning, I finally saw this little gem in person  - the bicycle he put together for his son Fugo. It is really something to see a tiny children's bike this elegant!

Children's Bike Customised by Tomii Cycles
The frame started out as a regular kid's mountain bike (Nao doesn't remember for sure what it was, but possibly a Schwinn). Stripped of the original paint, it was powdercoated a robin's egg blue and customised with some lovely components and accessories -

Children's Bike Customised by Tomii Cycles
including the tiny stainless fenders with leather mudflap in front

Children's Bike Customised by Tomii Cycles
and vintage-style reflector in the rear.

Children's Bike Customised by Tomii Cycles
The drilled-out chainguard was powdercoated to match the frame.

Children's Bike Customised by Tomii Cycles
The handlebars are the Belleville bars from Velo Orange, which are surprisingly proportional for the bicycle's size.

Children's Bike Customised by Tomii Cycles
Caramel coloured basket-weave grips and tiny silver bell.

Children's Bike Customised by Tomii Cycles
Prior to becoming a framebuilder, Nao had been making components under the 3RRR name, and often bikes in Boston can be found sporting his custom chainrings and headbadges. This propeller badge is one of his.

Children's Bike Customised by Tomii Cycles
I really like how this bicycle came out. It's beautiful and intriguing, but not "too much" for a children's bike. Recycled frame with decorative and functional touches, coaster brake, single speed, kickstand, nothing fragile or complicated. I like how the caramel accessories complement the pastel blue frame. The padded saddle has a scrap piece of leather stretched over it and matches the mud flap. The wide knobby tires are great for riding in the dirt and grass of the back yard, as well as in the nearby park. When I went to pick up the bike, I was warned that it would be heavy, but I didn't really believe it. How heavy could a bike this tiny be? "It weighs more than my own bike!" Nao clarified, referring to his steel roadbike, and he was right! 

Fugo's Bike
Fugo's relationship with this bicycle has been interesting. When Nao presented his son with the bike more than a year ago, the boy was not really impressed. He did not know how to ride yet and was not interested in learning. Then recently he suddenly wanted to try riding the bike. Nao was going to attach training wheels, but Fugo did not want them. He then got on the bike and began to ride, just like that.

Fugo's Bike
The trouble with nice children's bikes, is, of course, that children outgrow them fairly quickly. But looking at Fugo's bicycle and watching him ride it, I still can't help but think it is worth it. Great job, Nao, and happy riding to you both.

Tuesday, June 5, 2012

Re-shaping Deformed Leather Saddles: Trying the 'Blocking' Technique

Vintage Brooks Colt
Some time ago I acquired a vintage Brooks Colt saddle. The original Colts are pretty rare, so I was excited. Unfortunately the saddle was deformed, sporting a prominent ridge down the center. On top of that, the leather was hard as a rock. The saddle was outright painful to ride for more than a few minutes.

To deal with the ridge, I was encouraged to try the blocking technique: soaking the saddle in water to regain its original shape. And I received just as many warnings against trying the blocking technique: The saddle could snap in half or become even more deformed I was told, I could ruin it. So I will preface with a caveat: As I understand it, blocking has a spotty success rate. To be safe, I would suggest trying it only on a saddle that is already ruined and unridable, as mine was.

There are different variations of the method, and the one I initially used was as follows: I soaked the saddle under the faucet, both the surface and the underside, until it was evenly wet. I then wrapped it in a wet towel, wrapped that in a plastic bag and let it sit. Two days later I unwrapped the saddle to check on it and was stunned to discover that, while wet, it was still hard as a rock. The moisture did not seem to be soaking through at all. So I wrapped it back up and left it for an entire week. When I unwrapped it again, the saddle was a bit softer, but the ridge showed no signs of diminishing. I thought that if I left it in there any longer the saddle would start to rot. So I installed it on a trainer bike and tried riding on it, thinking I could now flatten the ridge that way. But it was too painful to ride and it wasn't working. Eventually, I gave up and decided the experiment was unsuccessful. I treated the saddle with a generous dose of Proofide and put it away in a box, not sure what I'd do with it.

Vintage Brooks Colt
Some time later, the Co-Habitant needed a saddle for one of his bike builds and I said he was welcome to give reviving the Colt another try. At this point, our collective memory of what exactly was done is less clear, but we agree that it involved yet more soaking. The way I recall it, this time he left the saddle in a sink filled with water overnight. Possibly more than once. Eventually the saddle did begin to show signs of softening, and when this happened he installed it on his bike and went out riding. 

The Co-Habitant weighs over 200lb, and I was worried that this was exactly the sort of situation where a soaked saddle might snap in half. However it did not snap, but began to straighten out under his weight. After a couple of rides and much Proofiding the deep ridge was flattened and now there are only a couple of gentle dimples in the sitbone areas. He says that the Colt is now very comfortable. It certainly looks nice and healthy: The colour is a rich warm chestnut and the surface is much smoother than it had been when I first received the saddle.

As our experience demonstrates, there is no one formula for this and you sort of have to play it by ear. The John Spooner description I linked to earlier suggests stuffing the saddle with newspaper after soaking it, but this did not seem appropriate in our case since the saddle was hardly soft enough even after excessive soaking. In general I'd say see how the leather behaves once you begin, and go from there. Start off conservative as far as water exposure, then get progressively more aggressive if that doesn't work. 

All things considered, the Co-Habitant's opinion is that the blocking technique is more trouble than it is worth and he does not recommend it. My opinion is that it really depends on how much you want to rescue that particular saddle, and how prepared you are to potentially ruin it in the process. I am glad that we revived the Colt and now have this beautiful, functional vintage saddle. What has been your experience with blocking or other saddle reshaping techniques?

Monday, April 23, 2012

Raleigh Lady's Tourist: Two Generations

1970s and 1930s Raleigh Tourists
As some might recall, I own two vintage Raleigh Lady's Tourists. Being in the midst of a major bike upheaval right now, I've retrieved these from storage and took the opportunity to photograph them together. The bicycle on the left is a 1973 DL-1. It has been refurbished and modified over the years (aftermarket chaincase, tires, rack, dress guards, pump, saddle, grips and rear wheel), a very ridable bike but definitely not a collector's item. The bicycle on the right is a 1936 Tourist. This one is in original and unaltered condition, including an intact chaincase, rotting grips and tires, cracked frame pump and dilapidated saddle. In the future I would like to have the older Tourist restored professionally, and until I can afford that I will continue to carefully store it. The newer Tourist I've decided to use as a transportation bicycle again, having now sold off most of my other bikes (a topic for another post). In the meantime, I'd like to share some observations while I briefly have these beauties side by side. 

1970s and 1930s Raleigh Tourists
I am not very good at lining up bikes and comparing them properly, but I'll try. Despite the older Tourist appearing smaller to the naked eye than the newer model, their wheelbases are near-identical - as are their bottom bracket heights (300mm), the lengths of their chainstays (500mm), their front-center measurements (680mm), and the lengths of their seat tubes (540mm center to center, or 560mm center to top - a.k.a. the 22" frame size). The seat tube angles look identical. The headtube angle on the newer bike looks like it could be slightly steeper, but I am unable to measure precisely. The forks line up identically. The virtual top tube on the older bike is a little shorter (570mm compared to 580mm on the newer one, measured center to center). But the most glaring difference is in the height of the head tubes.

1970s and 1930s Raleigh Tourists
The headtube on the 1973 Tourist measures 185mm from the very bottom of the lower lug to the very top of the upper lug. On the 1936 Tourist, the headtube measures 265mm. That's a considerable difference, placing the older bicycle's handlebars quite a bit higher. Combined with the slightly shorter virtual top tube, the rider is overall more upright. 

1970s and 1930s Raleigh Tourists
The quadrant shifter on the older model is on the top tube.

1970s and 1930s Raleigh Tourists
Notice also that the handlebars used in the '70s are different than those used in the '30s. The older ones were narrower, and angled straight back with no forward sweep to them.

1970s and 1930s Raleigh Tourists
On the older bike, the pump is behind the seat tube and there is a lugged connection between the down tube and the looped top tube. On the newer model the pump sits between those tubes and there is no lugged connector.

1970s and 1930s Raleigh Tourists
Overall I would say that the two bicycles are more similar than not, and it's interesting to me that so few changes were made between those 4 decades. I would love to see how a 1950s model compares to these two.

Monday, February 13, 2012

First Look: Sogreni Young Shatterhand

Sogreni Young Shatterhand
After a serendipitous chain of events last week, I picked up a Sogreni bicycle on the cheap from a local bike shop that wanted to get rid of it. At some point they used to import Sogreni, but no longer do, and this particular bicycle is a left-over demo model that was also used as a shop loaner. It is a men's "Young Shatterhand" model and happens to be my size. The bike is about 4 years old and was ridden hard over that time. I got it solely for the purpose of test riding and reviewing a Sogreni, but first it needs some refurbishment.

Sogreni Young Shatterhand, Fork Crown
Sogreni is a small Danish bicycle manufacturer founded by Søren Sögreni in the 1980s. They currently offer a collection of 6 diamond and step-through frame models that are distinguished by a look I would describe as "minimalist steampunk." Lugged frames in shades of gray and silver, innovative copper accessories, and a sparse aesthetic with subtle visual quirks give Sogreni bikes somewhat of an otherworldly appearance. While the specimen I have is missing some of the components and accessories it originally came with, its essential Sogreniness has remained intact. The colour is a perfect match for an industrial chain link fence. I do not know for sure where the frames are made (according to word of mouth, Eastern Europe), so I've asked the manufacturer and will post their response when I receive it.

Sogreni Young Shatterhand
When I took possession of the bicycle, it had no seat post or saddle, the wheels were untrue, and the rear hub was not entirely functional. I have since installed a seatpost and a light brown Selle Anatomica saddle. The Co-Habitant trued the wheels and adjusted the hub enough to make the bicycle ridable.

Sogreni Young Shatterhand, Handlebars
We've also replaced the super-tall original stem with a more standard one, as I could not manage the handlebars being that high. Other than that, everything shown is as-is.

Sogreni Leather Grips
I am particularly glad that the leather grips, while scuffed, have survived and remained with the bicycle.

Sogreni Young Shatterhand, Head Lugs
The fully lugged frame has a 52cm seat tube, a subtly sloping 54cm top tube, and 26" wheels with fat knobby tires.

Sogreni Young Shatterhand, Fork
The geometry is roadish, with steep angles and a moderate wheelbase. Sogreni describes it as a road frame with upright handlebars and mountain bike wheels. There is no toe overlap on the 52cm size bike.

Sogreni Young Shatterhand, Fender
One quirk that is immediately noticeable when looking at this bicycle, is the gap between the tire and the fender. This seems to be an intentional design element, because even the models with larger wheels have this gap.

Sogreni Young Shatterhand, Fender
My first thought upon seeing this was "Great, looks like there is room here for Shwalbe Fat Franks!" But on closer inspection I don't think the fork is wide enough.

Sogreni Young Shatterhand, Fork
The flat fenders, while visually interesting, also present a challenge for mounting a front brake caliper, which the bicycle currently lacks. After some research we've figured out that a 1990s style BMX brake will probably work and I'll be getting one soon to try it.

Sogreni Young Shatterhand, Coaster Brake
Until then, the bicycle is coaster-brake only, and I will write about the experience of that in Boston traffic in a separate post. The rear hub (a single speed Shimano) has problems and is visibly beat up. We are not sure what happened to it or of the extent of the damage yet, but the gist of it is that the hub displays "fixed" characteristics and the cranks rotate forward even while coasting. This comes and goes spontaneously and to different degrees. The coaster brake function seems to work fine, but I am cautious riding it nonetheless.

Sogreni Young Shatterhand
Well, that is all I have about this bicycle so far. I would like to get a front brake on it and take it on a couple of longer, faster rides before commenting on the ride quality. For now we will keep working on the hub and see how that goes. A Sogreni in the US is a pretty lucky find and I look forward to getting to know it.

Tuesday, August 30, 2011

Gritty to Pretty: the Lovely Donation Bike!

Refurbished Shogun 400
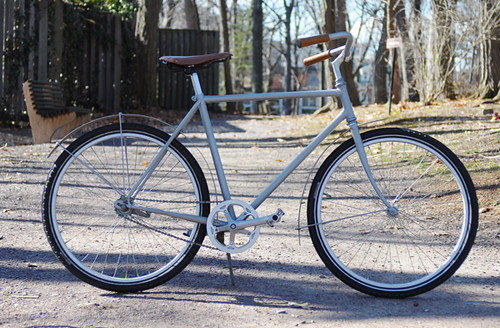
I am pleased to report that the refurbished vintage donation touring bike - also known as "the roadbike for women who fear roadbikes" - is ready! As often happens with these things, the project took longer than I anticipated. In the end we did not have time to put the bicycle together ourselves, and I entrusted the job to the saintly Jim at Harris Cyclery - which contributed the labor pro bono and donated the remaining parts my build was missing, thus becoming a sponsor of this project along with Velo Orange. My sincere thanks to them, as well as to all readers who contributed parts and funds to this effort. This is not yet the official give-away announcement, as I first wanted to show off some pictures and describe the bicycle in detail. I hope you like it!

Refurbished Shogun 400
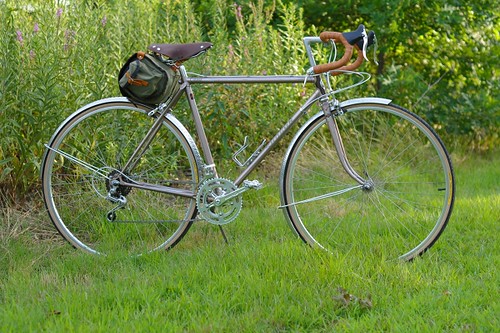
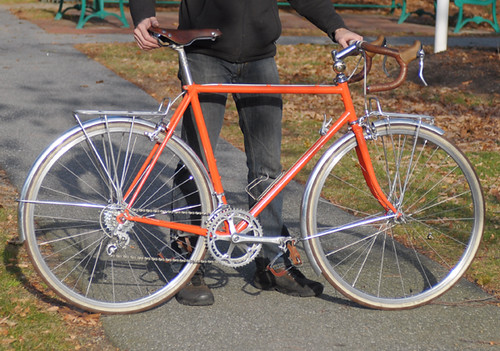
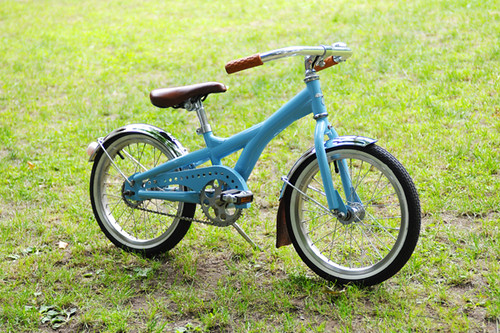
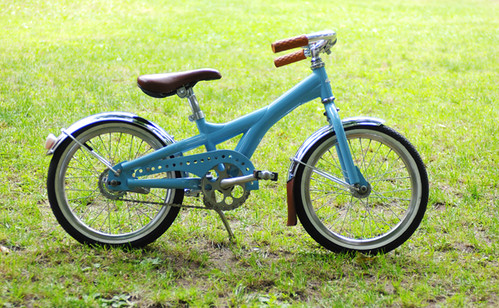
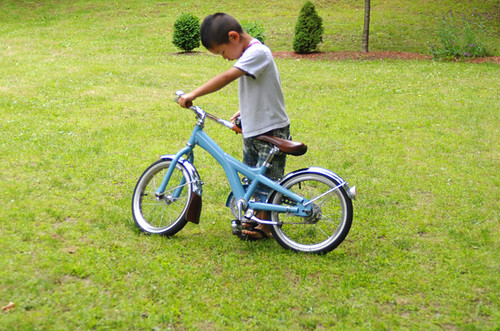
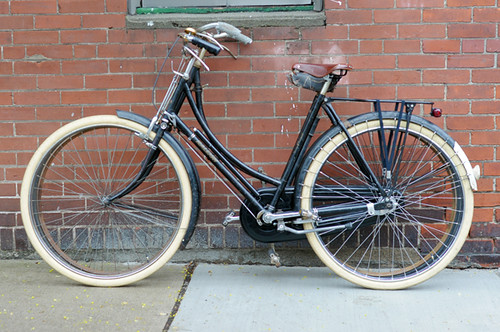
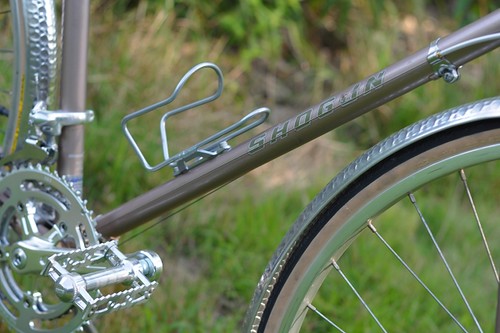
So what exactly is this bicycle... It began as a vintage Shogun 400 touring bike that looked like this when I picked it up, but has been rebuilt from the frame up. When I spotted the original bike, I immediately thought it had potential. The early '80s Japanese cro-moly frame with relaxed geometry promised a comfortable, "Rivendell-esque" ride. And, despite the fairly small size (52cm), it looked like there would be no toe overlap, even with fenders. As many know, it is extremely difficult to find a roadbike in a small size, with relaxed geometry and no toe overlap - be it modern or vintage - which is what makes some of these unassuming vintage Japanese frames special. My idea was to start with such a frame and build it up with comfortable, functional components - ending up with an unintimidating "starter" roadbike that a beginner would be able to learn on without undue nervousness or discomfort.

Refurbished Shogun, Nitto Randonneuring Bars
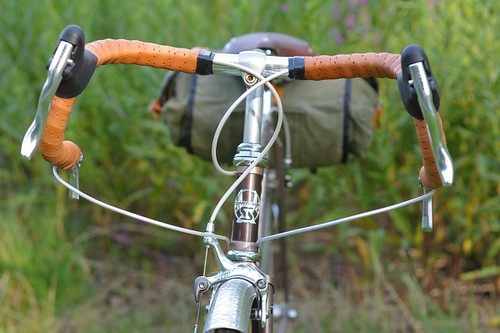
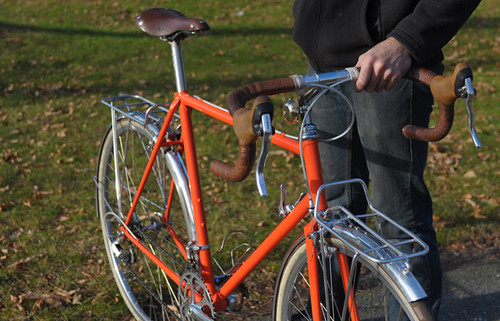
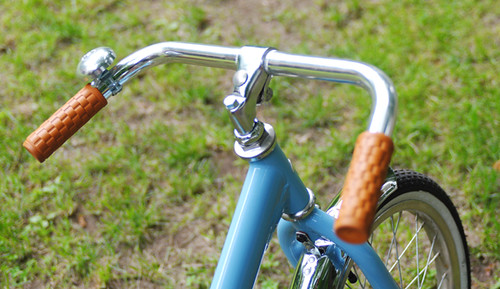
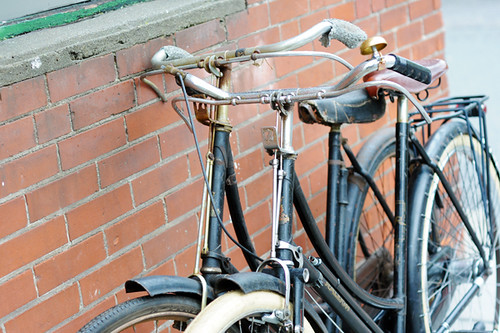
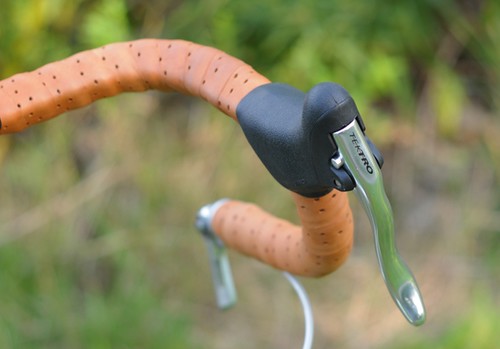
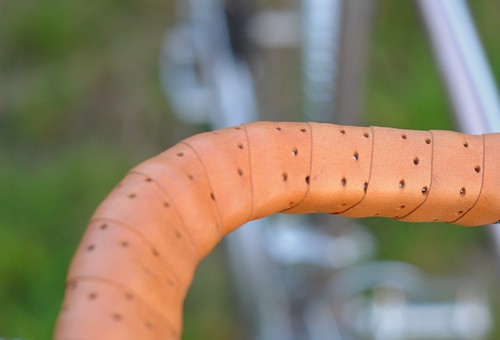
The biggest priority was the handlebar set-up. When women tell me they cannot ride vintage roadbikes, much of the time this turns out to be because the handlebars are uncomfortable - lacking a sufficient "shoulder" area. Those who are new to drop bars often assume that they are all the same, but in fact there are dozens of models, with subtle variations in shape. I chose the Nitto Randonneur handlebars for this bike, which have long, flat "shoulders" and a slight, ergonomic flare to them that most cyclists find extremely comfortable, particularly on long rides.

Refurbished Shogun, Tektro Brake Levers
I also chose modern Tektro short-reach brake levers, which are easy to squeeze from the top, even for those with weak hands.
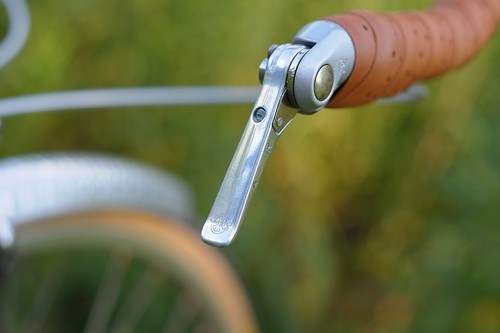
Refurbished Shogun, Silver Bar-End Shifters
Finally, I chose Silver bar-end shifters, which are much, much easier to use than downtube shifters and less awkward than stem shifters.

Refurbished Shogun, VO Bar Tape
The leather handlebar tape is by Velo Orange. I had never tried it before and was glad to discover that it has a softer, more matte texture to it that Brooks leather tape (which I personally find a little too slippery).

Refurbished Shogun, VO Saddle
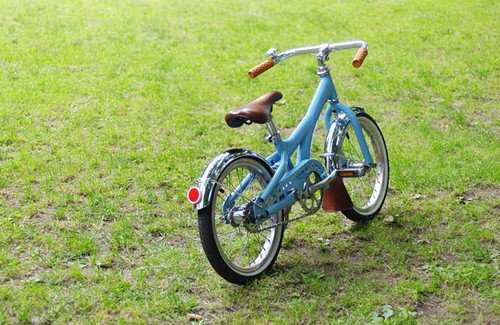
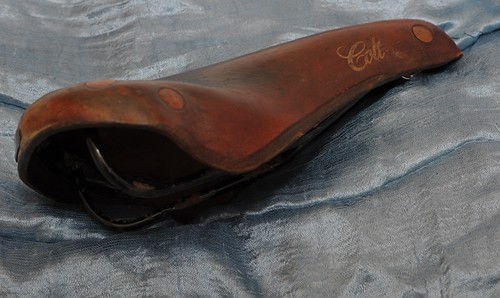
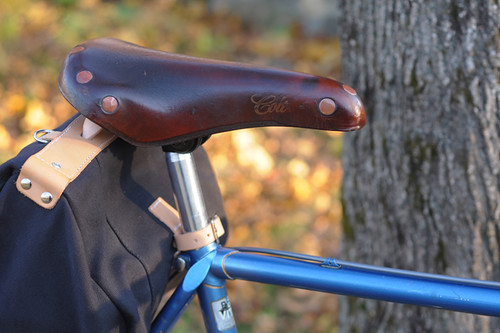
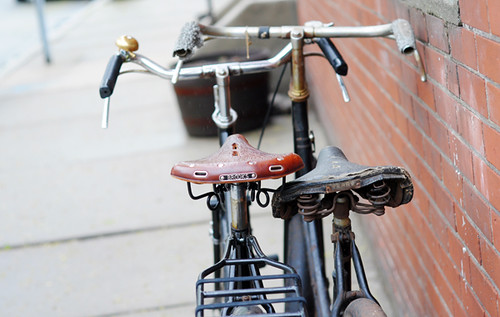
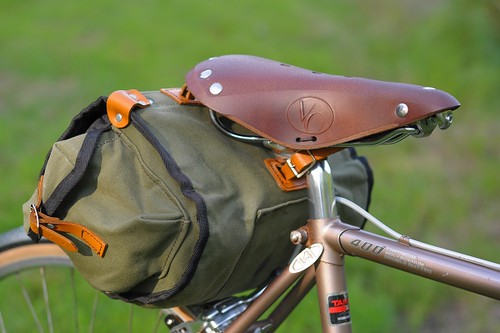
Velo Orange Model 3 touring saddle. Saddle comfort is one of these things that is different for everyone, but I have to say that (somewhat to my surprise) I found this one more comfortable than the Brooks B17s I once owned. The leather is very different from Brooks leather, and I cannot speak for its longevity or durability. But for me, there was no "breaking in" period, and no pressure on sensitive body parts. I will soon write a review of this saddle with additional details.

Refurbished Shogun, VO Fenders
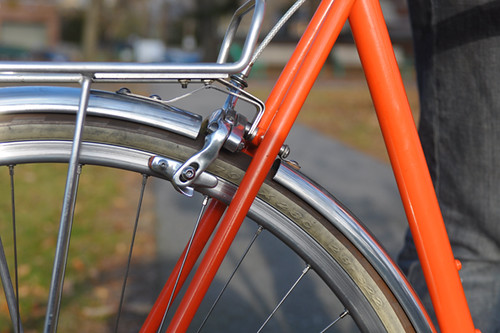
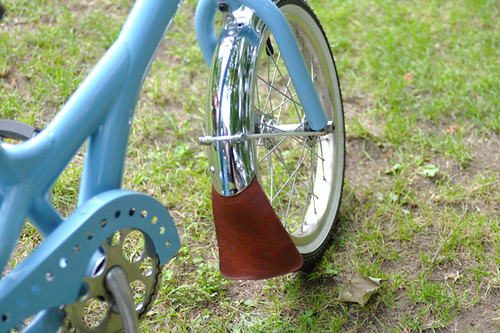
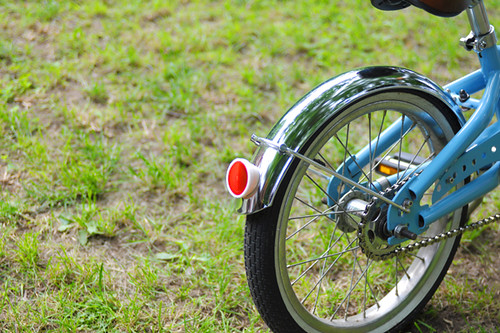
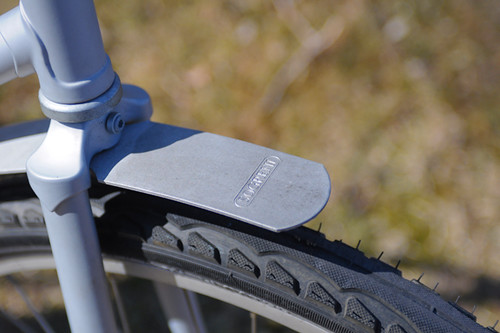
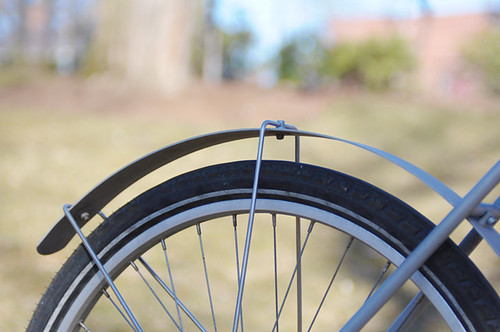
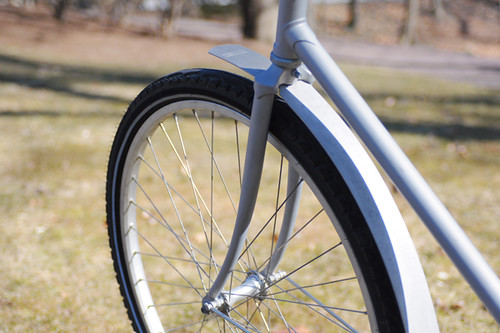
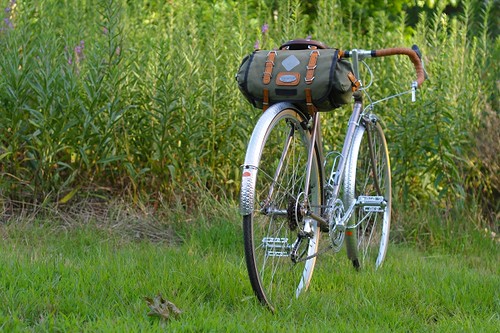
Velo Orange hammered fenders, their pattern of indentations resembling a honeycomb. Later I will also post a comparison between the VO and Honjo versions of hammered fenders.

Refurbished Shogun, VO Crankset
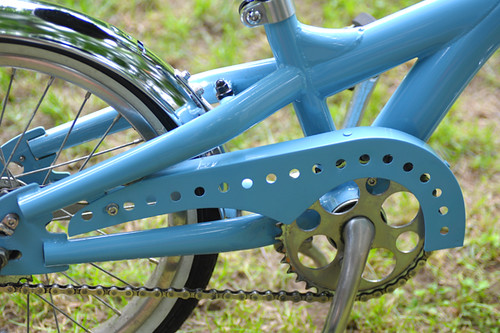
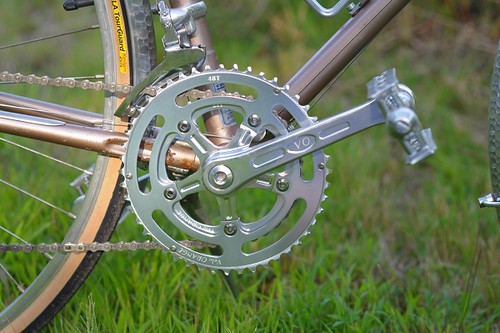
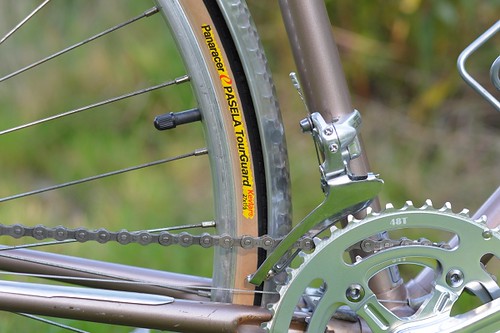
Velo Orange also provided the headset and their Grand Cru double crankset. It was exciting when these cranksets came out, because they are classically shaped yet affordable. Personally, I find the looks of chunky modern cranksets rather depressing, so it's wonderful that these are an option. I have not ridden with them except during my test rides of this bike, but I welcome readers who've owned them to provide feedback. The pedals included are MKS Touring pedals, which I have on most of my bikes and love.

Refurbished Shogun, Panaracer Pasela Tires
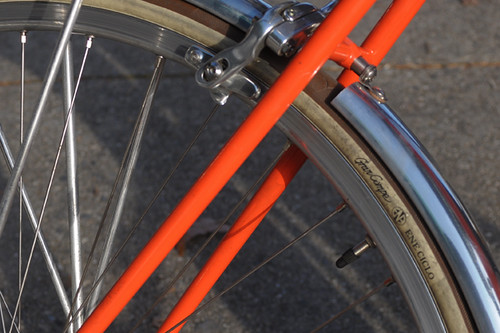
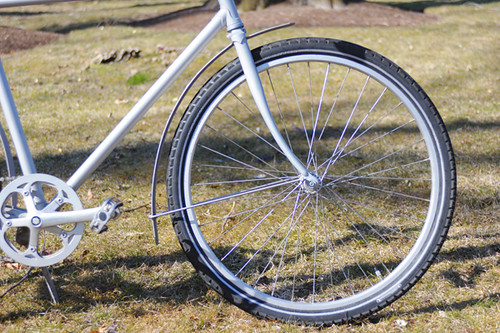
The wheels are 27" touring wheels from the early '80s - a slightly nicer and cleaner version than the ones originally on the bike. The tires are the puncture-resistant Panaracer Pasela Tourguards. The headset, bottom bracket, chain, brakes, and front derailleur have all been replaced with modern components.

Refurbished Shogun, Original Wheelset
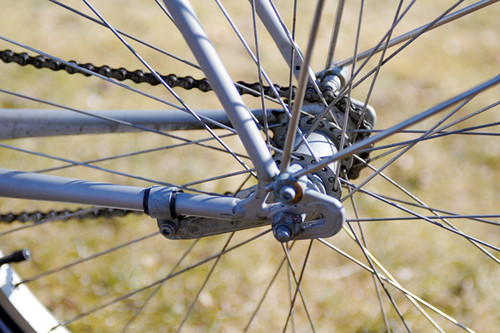
The rear cassette and derailleur are pretty much the only components that were left original. They are in good condition, but the downside is that the bicycle is only a 12 speed - as bikes of its era are. In order to upgrade to a cassette with more cogs, we would have needed to get modern wheels, which was beyond the scope of this project.

Refurbished Shogun 400
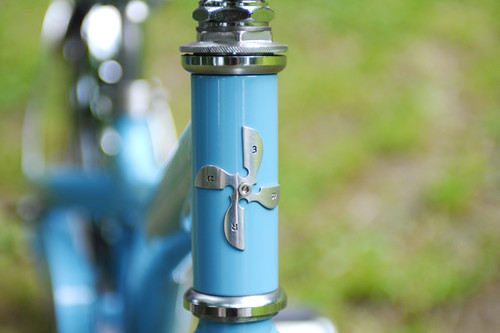
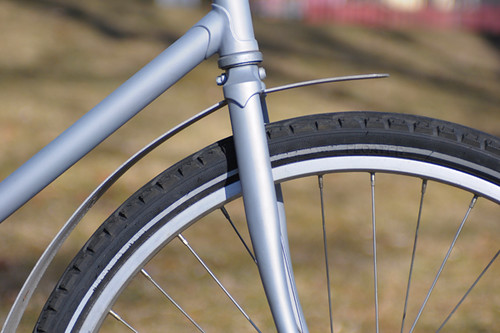
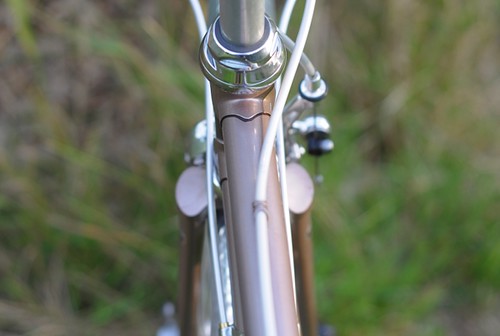
Here is a close-up of the bicycle's colour: an unusual champagne-lilac that I personally find very attractive.

Refurbished Shogun 400
The frame has been left original - frayed decals, rust spots and all - and I want to make it very clear that at heart this is still a vintage bike that looks its age, despite the updated components.
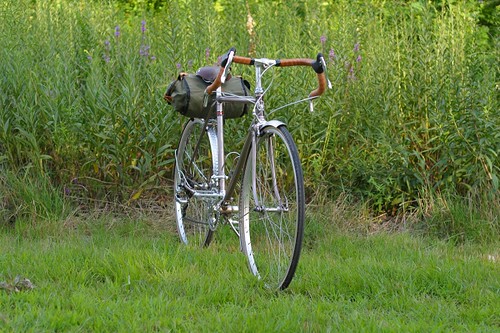
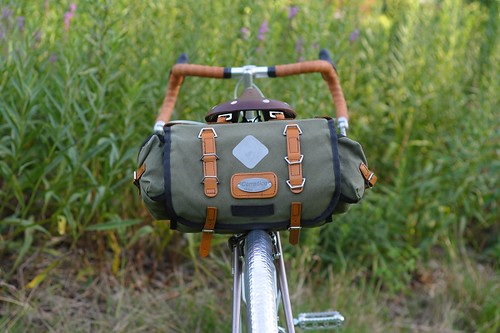
Refurbished Shogun, Carradice
I received a Rivendell "SaddleSack" as a donation from one of my readers, but I think this bike works better with a Carradice. So I will let the recipient choose - either the SaddleSack, or one of my own Carradice bags, as shown here. I will soon post a review of the SaddleSack (pictured here).

Refurbished Shogun, Carradice
And so that's it, in a nutshell. To my eye, this bicycle looks modestly beautiful, which is what I was aiming for. It is fairly light and is easy to carry. It is not "fast" by modern roadbike standards, so please don't expect to race or join paceline rides on it. Neither is it a bike for a tour of the Alps, since the gearing is somewhat limited by current standards. It is really meant to be a low-key, introductory roadbike for those with no athletic background, for those who want to explore nature while getting a bit of exercise, and for those who don't want to wear lycra and be all "serious" about roadcycling. If you've been unable to ride roadbikes in the past, this bike may be a good alternative to the ones you've tried. It is friendly. It is stable. There is no toe overlap. Lots of room on the handlebars for moving your hands around. Brake levers are easy to reach and easy to squeeze. Frame geometry is relaxed and won't hurt your knees. Having ridden the bike myself for a bit, it handles as comfortably and easily as I hoped. I've even ridden it in a dress and sandals, and it was great - just a really easy-going, "smell the flowers" kind of bike. Bicycles with drop bars are not for everyone - but this is as unintimidating of a way to try one as I can offer. I will announce the contest rules and timeline in the coming days, and I hope this bicycle will find the right owner.

I want to express my thanks again to Velo Orange, Harris Cyclery, and the generous readers who have contributed to this project: Justine, G.E., Neighbourtease, Spindizzy, Cedar, Somervillain, and others!