Showing posts with label diamond frame. Show all posts

Monday, July 23, 2012

Brake Cable Guides Along the Top Tube

Testing a Selle Anatomica Titanico, New Version
I've been curious about the different styles of rear brake cable routing along top tubes. If you look at vintage roadbikes and some currently produced classic bikes, they tend to have three guides along the top, with the brake cable passing through them enclosed in housing. 

Axiom S, Clover
On the other hand, modern bikes tend to have two stop guides underneath the top tube, with the exposed inner cable stretched between them. 

Susan's Pink Sketchy
There are variations to this, such as routing the two stop guides along the side of the top tube, as well as possibly along the top. There is also internal routing and a variety of methods for bikes without top tubes, but that is a separate story. The three through-guides along the top vs the two stop-guides (usually) along the bottom seem to be the dominant methods as far as I can tell. 

Top Tube Cable Routing
From a purely tactile standpoint, my own preference is the top routing. I don't like feeling the exposed brake cable along the bottom when I pick up the bike by the top tube. And when it's routed along the side I can sometimes feel it with my leg, or my clothing catches on one of the stop guides. Some say they prefer the vintage style because the brake cable is safer from the elements when enclosed in housing. Others explain that the two stop-guides method improves rear braking and saves weight - while others still argue that the differences are not significant enough to be of real advantage. I've also heard horror stories about people's genitals getting torn on the cable guides along the top, which is supposedly why this style is no longer the norm. I have no idea how legitimate any of these reasons are. Is there is an official explanation of the advantages of one style over another? Which do you prefer?

Monday, February 13, 2012

First Look: Sogreni Young Shatterhand

Sogreni Young Shatterhand
After a serendipitous chain of events last week, I picked up a Sogreni bicycle on the cheap from a local bike shop that wanted to get rid of it. At some point they used to import Sogreni, but no longer do, and this particular bicycle is a left-over demo model that was also used as a shop loaner. It is a men's "Young Shatterhand" model and happens to be my size. The bike is about 4 years old and was ridden hard over that time. I got it solely for the purpose of test riding and reviewing a Sogreni, but first it needs some refurbishment.

Sogreni Young Shatterhand, Fork Crown
Sogreni is a small Danish bicycle manufacturer founded by Søren Sögreni in the 1980s. They currently offer a collection of 6 diamond and step-through frame models that are distinguished by a look I would describe as "minimalist steampunk." Lugged frames in shades of gray and silver, innovative copper accessories, and a sparse aesthetic with subtle visual quirks give Sogreni bikes somewhat of an otherworldly appearance. While the specimen I have is missing some of the components and accessories it originally came with, its essential Sogreniness has remained intact. The colour is a perfect match for an industrial chain link fence. I do not know for sure where the frames are made (according to word of mouth, Eastern Europe), so I've asked the manufacturer and will post their response when I receive it.

Sogreni Young Shatterhand
When I took possession of the bicycle, it had no seat post or saddle, the wheels were untrue, and the rear hub was not entirely functional. I have since installed a seatpost and a light brown Selle Anatomica saddle. The Co-Habitant trued the wheels and adjusted the hub enough to make the bicycle ridable.

Sogreni Young Shatterhand, Handlebars
We've also replaced the super-tall original stem with a more standard one, as I could not manage the handlebars being that high. Other than that, everything shown is as-is.

Sogreni Leather Grips
I am particularly glad that the leather grips, while scuffed, have survived and remained with the bicycle.

Sogreni Young Shatterhand, Head Lugs
The fully lugged frame has a 52cm seat tube, a subtly sloping 54cm top tube, and 26" wheels with fat knobby tires.

Sogreni Young Shatterhand, Fork
The geometry is roadish, with steep angles and a moderate wheelbase. Sogreni describes it as a road frame with upright handlebars and mountain bike wheels. There is no toe overlap on the 52cm size bike.

Sogreni Young Shatterhand, Fender
One quirk that is immediately noticeable when looking at this bicycle, is the gap between the tire and the fender. This seems to be an intentional design element, because even the models with larger wheels have this gap.

Sogreni Young Shatterhand, Fender
My first thought upon seeing this was "Great, looks like there is room here for Shwalbe Fat Franks!" But on closer inspection I don't think the fork is wide enough.

Sogreni Young Shatterhand, Fork
The flat fenders, while visually interesting, also present a challenge for mounting a front brake caliper, which the bicycle currently lacks. After some research we've figured out that a 1990s style BMX brake will probably work and I'll be getting one soon to try it.

Sogreni Young Shatterhand, Coaster Brake
Until then, the bicycle is coaster-brake only, and I will write about the experience of that in Boston traffic in a separate post. The rear hub (a single speed Shimano) has problems and is visibly beat up. We are not sure what happened to it or of the extent of the damage yet, but the gist of it is that the hub displays "fixed" characteristics and the cranks rotate forward even while coasting. This comes and goes spontaneously and to different degrees. The coaster brake function seems to work fine, but I am cautious riding it nonetheless.

Sogreni Young Shatterhand
Well, that is all I have about this bicycle so far. I would like to get a front brake on it and take it on a couple of longer, faster rides before commenting on the ride quality. For now we will keep working on the hub and see how that goes. A Sogreni in the US is a pretty lucky find and I look forward to getting to know it.

Thursday, January 12, 2012

Sport vs Transport: a Polarisation

Bella Ciao with House of Talents Basket
When I write about topics such as cycling clothing, fixed gear, bike handling skills, etc., someone will inevitably chime in to point out that these things are not necessary for "everyday" cycling. This is rather ironic given that my blog started precisely because I felt such things were not necessary for everyday cycling. It is also ironic, because I still very much agree. This here above is a transportation bicycle. It is my "everyday bike" - that is, the bicycle I ride to get around. In a skirt and blouse. In a 3/4 length overcoat. In office shoes. With my laptop bag strapped to the rear rack. It is the exact same type of bicycle I rode for transportation when I first started this blog. My preferences in this regard have not changed over time; they have only solidified.

Francesco Moser 2.0
Now this here is a roadbike. This type of bicycle is designed for sport, and it is meant to go fast over long distances. I love riding this thing. I ride is as fast as I can, because that's the point - to get an intense workout and to see how well I can do. As with other athletic activities (jogging, aerobics, skiing), it is more comfortable and also customary to wear special clothing for roadcycling. That is why on my roadbike I wear padded shorts, a cycling jersey, padded gloves and dorky sunglasses. Sometimes even a helmet. Over time, I have come to enjoy the sport of roadcycling more and more, and while I am not very good at it yet, I hope that some day I might be. I've recently joined a local club. Maybe in a couple of years I can even race. But all of this has as little to do with me as a transportational cyclist, as a newfound interest in running would have with my being a pedestrian. 

P-Town Bike Walking
It is an unfortunate fact that in some countries today, including the US, cycling for sport and cycling for transportation are often confounded. It is also true that when some people get into road cycling, athletic sensibilities end up colouring their view of what transportation cycling should be like as well: They grow impatient with the slower speed of upright bikes, and find it strange to wear everyday clothes on a bicycle at all. For these reasons, I do understand why it makes some nervous when roadcycling topics appear on this blog. Will I eventually be lost to this mentality? I have good reason to believe that no. I am not willing to change the way I dress in order to accommodate the bike, and I cannot ride a roadbike comfortably in my regular clothing. There have been situations where I've ridden diamond frame bikes with drop bars for transportation out of necessity, and I can certainly do it. But inevitably I am miserable, and I long for my upright step-through bike. 

Van Nicholas, Art Supplies
Aside from the clothing issue, I just feel safer and more relaxed cycling through traffic in an upright position. And since I control my speed in an urban environment anyhow, my upright bike is more than good enough for me in that respect.  Step-through frames have the additional advantage in that they are easy to hop on and off, especially with packages on the rear rack. No matter how nicely a bicycle handles, unless it has a step-through frame I ultimately find it impractical for me in an everyday context.  I have very clear ideas at this point of what works for me as a transportation bicycle, and being involved in roadcycling has only made me appreciate the differences between sport and transport more. I have no desire to blend the two activities. When I ride a roadbike, I basically look like this and I am not bothered by that in the least. Speed over style, to be sure. But for getting around in everyday life, I want to retain my identity, and I want to feel comfortable in every way. 

Test Riding a Bobbin Birdie
To me, thinking of roadcycling and transportation cycling as two radically different things just seems like common sense. In Europe I know many people who race for sport, but get around town on a traditional upright bicycle, and this is considered entirely normal. Why even Henry of Workcycles used to race, and still enjoys riding his track bike on the velodrome on a regular basis. Perhaps some day this dichotomy will be better understood in the US as well. Some do believe that road and transportational cycling can overlap, or at least inform each other, and I am not threatened by that point of view. Also, sometimes it's just fun or funny to combine the two: There are, after all, cargo bike races, Brompton races, and no doubt someone out there has held an omafiets race. Steven Fleming of cycle-space wrote a post on how racing for sport and riding a cargo bike for transportation figure into his identity, which I certainly found interesting. Me, I simply see the road vs transportation cycling dichotomy as the 2-wheeled version of walking vs jogging. The more I cycle for transportation, and the more involved I get in roadcycling as a sport, the more I appreciate them as two distinct and separate realms. 

Saturday, December 17, 2011

Seatpost Setback and Related Matters

Origin8 Seatpost, Zero Setback
A couple of days ago I replaced the seatpost on my Rivendell Sam Hillborne with one that has zero setback, and the change has been interesting. Before I go any further, I will warn you that this is a continuation of the long top tube post. So if that one gave you a headache, please stop reading now and save your sanity! Or, continue at your own risk.

For those new to the concept of setback, seatposts come with different amounts of it. One of the things the setback does is move the saddle clamp back, thus altering a bike's effective seat tube angle. Say your bicycle frame has a 74° seat tube, and you buy a seatpost with 2cm of setback. Unless you counteract the setback by moving the saddle forward along the rails, your bicycle's effective seat tube angle will be 2° slacker, making it more like 72°. And you can make it slacker still by pushing the saddle further backward. By contrast, a seatpost that goes straight up with no setback leaves your frame's natural seat tube angle unaltered. Seat tubes today tend to be steep, so it is rare that anybody wants to make them steeper still. But with a zero-setback seatpost, it is possible to make the effective angle a bit steeper by pushing the saddle forward on the rails.

2 Year Riv SH Frame-a-versary
The other factor influenced by a seatpost's setback is the reach from saddle to handlebars. The more setback a seatpost has, the further the saddle moves away from the handlebars. Here it is worth noting that bicycle fit experts typically warn against messing with seatpost setback and saddle positioning in order to alter reach. Instead it is advised that one's saddle position preference should be fixed in relation to the bottom bracket. At least that is my understanding.

Getting back to my bike, it has a 52cm seat tube and a 57.5cm top tube - the latter being unusually long given the former. Additionally, it has a 71.5° seat tube angle, which is atypically slack. In previous posts I explained that when I ride this bicycle, I feel as if my body is not sufficiently forward. The long top tube will not allow me to fit the bike with a stem longer than 7cm, and the slack seat tube puts me further back still.

2 Year Riv SH Frame-a-versary
Originally the bike was built up with a seatpost with generous setback, making the effective seat tube angle even slacker than its natural 71.5°. Eventually I replaced it with a seatpost that had only minimal setback, but even that did not feel as if I were sufficiently forward. I was reluctant to go with a zero-setback seatpost, because everyone I spoke to acted horrified by the idea. "Zero setback? What are you trying to do, turn it into a racing bike?" However, after the "long top tube" post I came to the conclusion that a zero setback seatpost is the most obvious solution. Far from making the bike "racy," it would simply continue the frame's already slack seat tube angle without slackening it further. Or, I could move the saddle a tiny bit forward and make the effective seat tube angle a rather normal 73° (as it is on my other two bicycles with drop bars). So, that is exactly what I did.

The welcome side-effect of the new saddle position is that the long top tube problem seems to be resolved. My reach has been reduced considerably and I can get a longer stem if I want. But even with the current stem I already feel myself positioned significantly more forward on the bike than before. The subjective sensation of this is greater than I would have predicted: I feel more in control over the steering, and I feel that the bicycle is distinctly faster to accelerate and to start from a stop. Although visually the saddle comes across as being too far forward now, its relationship to the bottom bracket is actually quite normal for a roadbike (off-the-shelf road frames in my size typically have 74-75° seat tube angles). I need to take the bicycle on a longer ride before I can say more, but I think this setup may be just the thing.

It's been exactly two years since I received the Sam Hillborne frame as a holiday gift, and this bicycle has given me over 2,000 happy miles. I've changed a lot as a cyclist over this time and the Sam's frame is quirkier than I initially realised. But I am going to try and make it work for me - hopefully learning a thing or two in the process.

Wednesday, December 7, 2011

Long Top Tubes and Drop Bars

Successful Setup w. Triple Crankset and Campy Ergos
I was reading the Rivendell blog today, where Grant Petersen revealed a "mystery bike" that has been in the works for some time. It looks like this. And aside from the obvious oddities, it is endowed with an unusually long top tube for its size: a 62.5cm top tube on a 54.3cm frame. Apropos this geometry, Rivendell notes that the bicycle is "basically a flat-to-rolling land bike that, by virtue of it’s superlong top tube ...locks you into a sweeepyback bar." In other words, it would be difficult to set this bike up with drop bars due to the excessively long reach that would create. 

This got me thinking again about my own Rivendell bicycle: a Sam Hillborne that is a 52cm frame with a 57.5cm top tube. That is also an unusually long top tube, given the frame size. Aside from the standover, the 52cm frame fits like a much larger one - possibly too large for someone of my stature to set up as a roadbike. 

When I first got the bike, I could not ride with drop bars and so we did everything possible to ease me into it. The bike was built up with an extremely short stem (5cm) and the bars were set up considerably above saddle level. I rode it that way at first, gradually lowering the bars until finally they were level with the saddle. That felt fine for a while, and then came a time when I was ready for a longer stem (the 5cm was always meant to be temporary). The typical stem length for a roadbike is 9-11cm, but I soon understood that this range was out of the question given the long top tube - I would have to be lying down over the bike in order to reach the bars. So we replaced the 5cm stem with what we thought was an 8cm, but was actually a 7cm - and even that feels like a stretch. Now I find myself in bike fit purgatory: From the standpoint of how the bicycle handles, I feel as if I am not forward enough and would like a longer stem. But from the standpoint of reach, even the current stem is too long (and I have already shoved the saddle forward and replaced the seatpost with one that has as little setback as possible).  

According to Rivendell's sizing guidelines I belong on a 52cm frame, if not larger. However, it seems to me now that these guidelines are optimised for setting the bicycle up with upright handlebars (even though they do not explicitly say that). Otherwise I do not know how to interpret the sizing.  

Long top tubes are good for eliminating toe overlap. They are also ideal for fitting a bike with swept back handlebars, so that the bars don't hit your knees. But if you plan to set up a bicycle with drop bars at or below saddle level and use a standard length stem, a long top tube could be problematic - unless you have a long torso. If you own a Rivendell and have it set up as a roadbike, I would be interested in your take on this. 

Friday, September 2, 2011

The Art of the Ride Report: a Touring Bicycle Give-Away

Forest Ride BW
Thinking about the best way to give away the refurbished vintage touring bike "for women who fear roadbikes," I kept coming back to the connection between cycling and the Ride Report. If you've spent any time browsing blogs and websites about bicycles, you are no doubt familiar with the genre. While at its most basic level, a ride report is simply a description of a bicycle ride, it is really so much more. Some are infused with a seriousness and depth of analysis that is normally reserved for historical descriptions of war battles. Others are light-hearted and hilarious. Others still are impressively dull, filled with endless lists and technical descriptions. A Ride Report can resemble a travelogue, a parable, a newspaper article, or an entry in a physical fitness diary. A Ride Report can be self-aggrandising or self-depricating. A Ride Report can describe a 1,000 mile tour or a 1 mile trip to the grocery store with equal degrees of drama and suspense. At the heart of it, a Ride Report tells us less about the ride itself than about the cyclist - and the cyclist's relationship to their surroundings, their bicycle, and the very experience of riding a bike.

Not all of us excel at the Ride Report. I for one can seldom think of anything interesting to write about the rides I take - possibly because I space out and daydream through most of them! But a good Ride Report is a thing of beauty, and so I invite you, challenging as it may be, to try your hand at it. Here are the rules:

Submission Rules
In a narrative style of your choosing, describe a bicycle ride that is memorable or significant to you. It can be any sort of ride - transportation, recreation, sport, whatever. Please limit the length of the writing to what would constitute a typical blog entry. Accompanying images are a plus, but not required. Submit your Ride Report either by putting it online and posting a link to it here (preferred!), or by emailing a document to "filigreevelo at yahoo" with the subject header "Ride Report." You are welcome to submit even if you are not entering to win this bicycle. I will compile a sampling of entries and post it for everyone to enjoy. Submission Deadline is 18 September, 2011.

Refurbished Shogun 400
Give-Away Details
With the support of Harris Cyclery, Velo Orange, and a number of my readers, I am giving away a refurbished vintage touring bicycle to a woman who might benefit from it. Pictured above, this bicycle is described in elaborate detail here. Please read that post carefully to decide whether the bike is for you, and feel free to ask any questions in the comments here.

The bicycle is a 52cm frame with 27"x28mm tires and a longish top tube. It is best suitable for persons 5'6" - 5'8", depending on your proportions and how high you like to set up the saddle. The dusty-lilac, early 80s Japanese cro-moly frame is in "good" used condition. It is fitted with mostly modern components (Velo Orange, Nitto, Tektro, MKS, etc.) and is completed with fenders, a bottle cage, a saddlebag and a small air pump. The frame has comfortable relaxed angles, and no toe overlap. The bicycle is a 12-speed. For additional details and lots of pictures, once again please see this post.

This bicycle was built up with a female in mind. The ideal candidate is a cyclist who would like to ride a bike with drop bars, but has found roadbikes difficult, painful, intimidating, or otherwise problematic. The bike being given away is more tame than what you are likely to find on the market today, be it new or secondhand, without spending a fortune, and I hope that it will allow someone out there to enjoy a new form of cycling by easing into it gently and gradually.

Once again, the entry deadline is 18 September, 2011. Good luck, and thank you for taking part!

[Edited to add: The recipient has now been announced here. Thank you everyone for taking part!]

Tuesday, August 30, 2011

Gritty to Pretty: the Lovely Donation Bike!

Refurbished Shogun 400
I am pleased to report that the refurbished vintage donation touring bike - also known as "the roadbike for women who fear roadbikes" - is ready! As often happens with these things, the project took longer than I anticipated. In the end we did not have time to put the bicycle together ourselves, and I entrusted the job to the saintly Jim at Harris Cyclery - which contributed the labor pro bono and donated the remaining parts my build was missing, thus becoming a sponsor of this project along with Velo Orange. My sincere thanks to them, as well as to all readers who contributed parts and funds to this effort. This is not yet the official give-away announcement, as I first wanted to show off some pictures and describe the bicycle in detail. I hope you like it!

Refurbished Shogun 400
So what exactly is this bicycle... It began as a vintage Shogun 400 touring bike that looked like this when I picked it up, but has been rebuilt from the frame up. When I spotted the original bike, I immediately thought it had potential. The early '80s Japanese cro-moly frame with relaxed geometry promised a comfortable, "Rivendell-esque" ride. And, despite the fairly small size (52cm), it looked like there would be no toe overlap, even with fenders. As many know, it is extremely difficult to find a roadbike in a small size, with relaxed geometry and no toe overlap - be it modern or vintage - which is what makes some of these unassuming vintage Japanese frames special. My idea was to start with such a frame and build it up with comfortable, functional components - ending up with an unintimidating "starter" roadbike that a beginner would be able to learn on without undue nervousness or discomfort.

Refurbished Shogun, Nitto Randonneuring Bars
The biggest priority was the handlebar set-up. When women tell me they cannot ride vintage roadbikes, much of the time this turns out to be because the handlebars are uncomfortable - lacking a sufficient "shoulder" area. Those who are new to drop bars often assume that they are all the same, but in fact there are dozens of models, with subtle variations in shape. I chose the Nitto Randonneur handlebars for this bike, which have long, flat "shoulders" and a slight, ergonomic flare to them that most cyclists find extremely comfortable, particularly on long rides.

Refurbished Shogun, Tektro Brake Levers
I also chose modern Tektro short-reach brake levers, which are easy to squeeze from the top, even for those with weak hands.

Refurbished Shogun, Silver Bar-End Shifters
Finally, I chose Silver bar-end shifters, which are much, much easier to use than downtube shifters and less awkward than stem shifters.

Refurbished Shogun, VO Bar Tape
The leather handlebar tape is by Velo Orange. I had never tried it before and was glad to discover that it has a softer, more matte texture to it that Brooks leather tape (which I personally find a little too slippery).

Refurbished Shogun, VO Saddle
Velo Orange Model 3 touring saddle. Saddle comfort is one of these things that is different for everyone, but I have to say that (somewhat to my surprise) I found this one more comfortable than the Brooks B17s I once owned. The leather is very different from Brooks leather, and I cannot speak for its longevity or durability. But for me, there was no "breaking in" period, and no pressure on sensitive body parts. I will soon write a review of this saddle with additional details.

Refurbished Shogun, VO Fenders
Velo Orange hammered fenders, their pattern of indentations resembling a honeycomb. Later I will also post a comparison between the VO and Honjo versions of hammered fenders.

Refurbished Shogun, VO Crankset
Velo Orange also provided the headset and their Grand Cru double crankset. It was exciting when these cranksets came out, because they are classically shaped yet affordable. Personally, I find the looks of chunky modern cranksets rather depressing, so it's wonderful that these are an option. I have not ridden with them except during my test rides of this bike, but I welcome readers who've owned them to provide feedback. The pedals included are MKS Touring pedals, which I have on most of my bikes and love.

Refurbished Shogun, Panaracer Pasela Tires
The wheels are 27" touring wheels from the early '80s - a slightly nicer and cleaner version than the ones originally on the bike. The tires are the puncture-resistant Panaracer Pasela Tourguards. The headset, bottom bracket, chain, brakes, and front derailleur have all been replaced with modern components.

Refurbished Shogun, Original Wheelset
The rear cassette and derailleur are pretty much the only components that were left original. They are in good condition, but the downside is that the bicycle is only a 12 speed - as bikes of its era are. In order to upgrade to a cassette with more cogs, we would have needed to get modern wheels, which was beyond the scope of this project.

Refurbished Shogun 400
Here is a close-up of the bicycle's colour: an unusual champagne-lilac that I personally find very attractive.

Refurbished Shogun 400
The frame has been left original - frayed decals, rust spots and all - and I want to make it very clear that at heart this is still a vintage bike that looks its age, despite the updated components.

Refurbished Shogun, Carradice
I received a Rivendell "SaddleSack" as a donation from one of my readers, but I think this bike works better with a Carradice. So I will let the recipient choose - either the SaddleSack, or one of my own Carradice bags, as shown here. I will soon post a review of the SaddleSack (pictured here).

Refurbished Shogun, Carradice
And so that's it, in a nutshell. To my eye, this bicycle looks modestly beautiful, which is what I was aiming for. It is fairly light and is easy to carry. It is not "fast" by modern roadbike standards, so please don't expect to race or join paceline rides on it. Neither is it a bike for a tour of the Alps, since the gearing is somewhat limited by current standards. It is really meant to be a low-key, introductory roadbike for those with no athletic background, for those who want to explore nature while getting a bit of exercise, and for those who don't want to wear lycra and be all "serious" about roadcycling. If you've been unable to ride roadbikes in the past, this bike may be a good alternative to the ones you've tried. It is friendly. It is stable. There is no toe overlap. Lots of room on the handlebars for moving your hands around. Brake levers are easy to reach and easy to squeeze. Frame geometry is relaxed and won't hurt your knees. Having ridden the bike myself for a bit, it handles as comfortably and easily as I hoped. I've even ridden it in a dress and sandals, and it was great - just a really easy-going, "smell the flowers" kind of bike. Bicycles with drop bars are not for everyone - but this is as unintimidating of a way to try one as I can offer. I will announce the contest rules and timeline in the coming days, and I hope this bicycle will find the right owner.

I want to express my thanks again to Velo Orange, Harris Cyclery, and the generous readers who have contributed to this project: Justine, G.E., Neighbourtease, Spindizzy, Cedar, Somervillain, and others!

Saturday, June 18, 2011

The Surly Cross Check: a Colourful Build

Two months ago, the Co-Habitant got a Surly Cross Check frame that he wanted to build up as a fun on/off road bike around a touring wheelset with fat tires that we already had in our possession. He is getting a nice roadbike later this summer (waiting for the frame to be finished!), and the Surly was meant to be "the other bike" - a playful, go-anywhere bike built around an inexpensive frame, mostly using components we already had. He swiftly put the bike together and has now cycled about 500 miles on it. The Cross Check is technically a cyclocross frame, but it is versatile and can also be used for touring and commuting. Given its unusual build, we've had many questions about this bike and so I offer a review on the Co-Habitant's behalf.

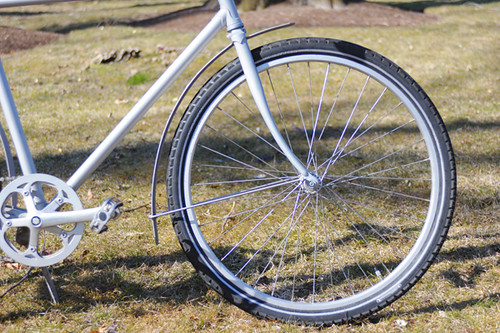
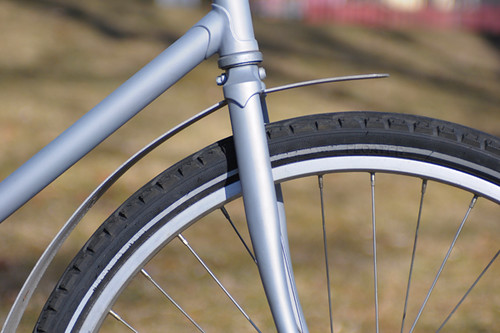
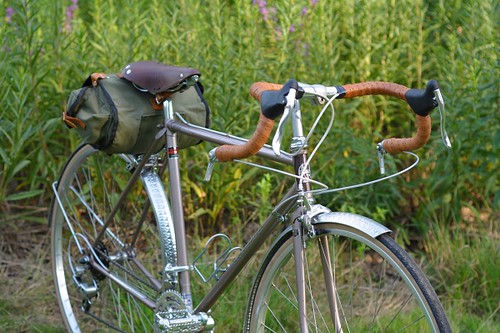
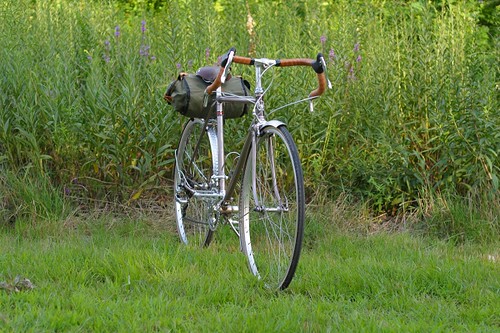
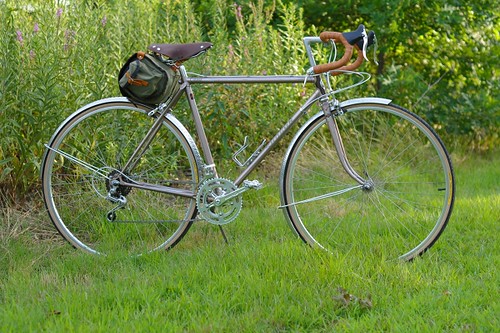
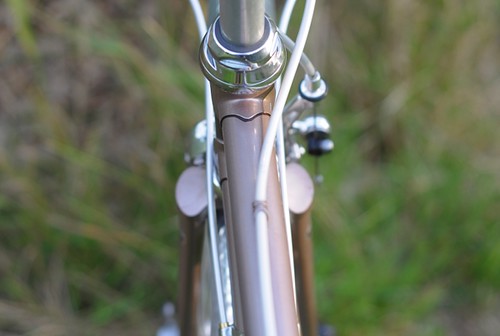
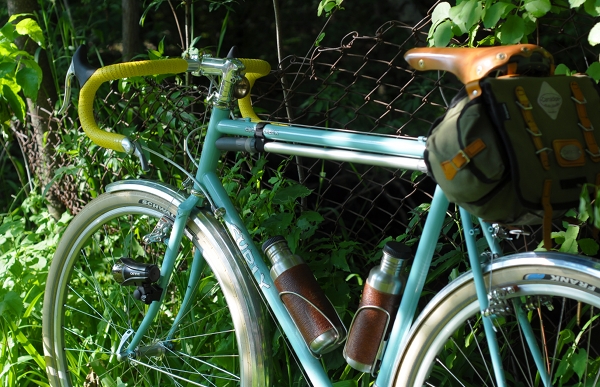
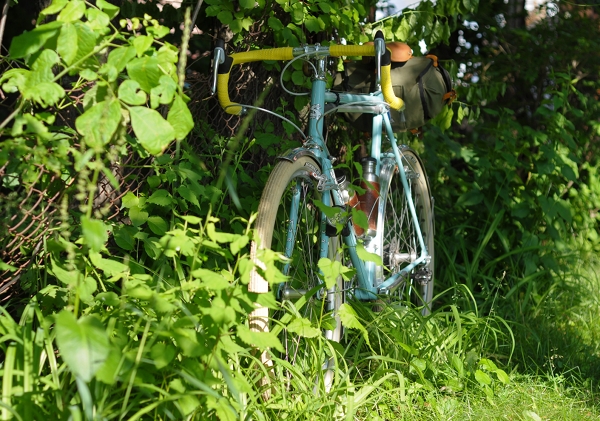
The most noteworthy aspect of the build, is that we were able to fit the frame with 
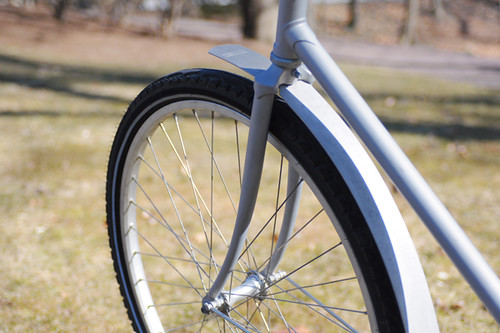
Schwalbe Fat Frank tires and metal fenders. This looks great, and the tires feel awesome, but to tell the truth the whole thing was a pain. The Cross Check is described as being able to fit tires up to 45mm with fenders, but the Fat Franks are 50mm. It was a tight fit that required some DIY. Initially we wanted to use Berthoud steel fenders, which are available in 700Cx60mm, but the Co-Habitant was not impressed with their quality upon seeing them in person. He also dislikes plastic fenders and did not want to use SKS. In the end he decided to get the Velo Orange Zeppelin 700c x 52mm fenders (which are rated for 42mm tire), and "massage" them to fit.

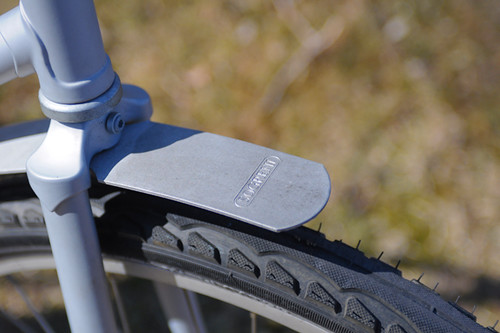
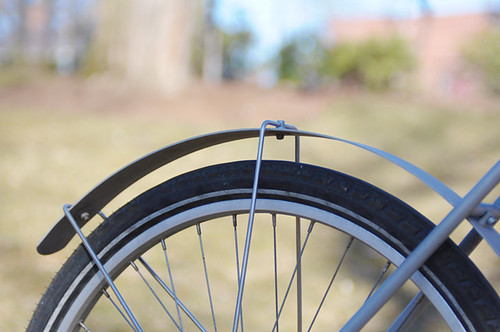
Out of the box, the fenders were too tight: The edges touched the sides of the tires and there was not enough space under the brake bridge and behind the seat tube to mount them high. So, the fenders had to be opened up. But when you open up a fender that's 52mm, it no longer follows the line of a 700C tire, instead making the opening much smaller. So while opening the fender, it had to also be stretched out -  taking care not to crimp the edges. To do this, he used a flat low table holding the fender upside down against its surface and pressing down gently, rolling it end to end - opening and pressing down. Pressing down would close the fender and opening it would alter the curvature, so the back and forth balanced out the opposing forces.

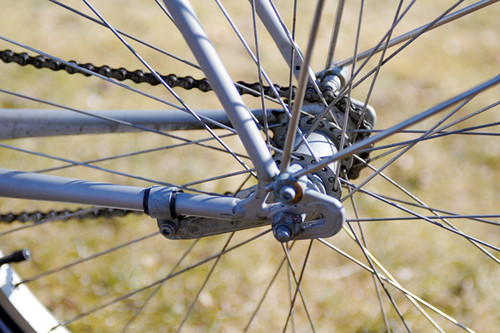
For the front fender there was sufficient clearance underneath the fork crown, but in the rear there was less clearance - the brake bridge is quite low and the chainstays are short. He had to dent the top of the rear fender (which isn't visible) in order to get it closer to the brake bridge, then fabricate a custom circular-L-bracket to hold the fender in place, screwed into the eyelet of the brake bridge. To dent the fender, he placed it on some clothing on the top edge of the back of a chair, then hit it with a rubberized end of a pedal wrench, creating a grooved dimple. He also had to dent the ends so that they wouldn't pinch near the bottom bracket. It was a bit of an ordeal, and if you are going to attempt this beware that it is easy to ruin the fender - it may not be a risk worth taking.

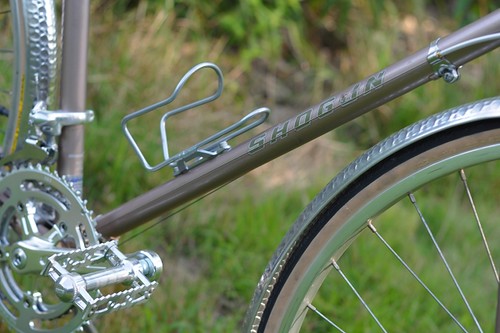
Happily, the "massaging" was a success and the Cross-Check looks great with the fat cream tires and the VO Zeppelin fenders. The ride is fast and cushy, and the Co-Habitant is discovering just how addictive wide tires are. On the downside, the clearances between the tires and fenders are so tight, that the set-up is not really practical for serious off-road cycling: stuff can get caught in there and cause problems. But for fire trails and gravel paths it is fine, and if he decides to do anything more serious (like the D2R2!), he will remove the fenders.

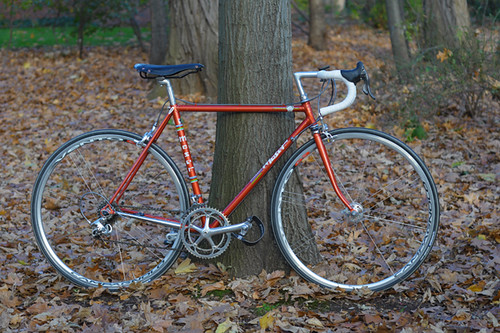
The rest of the build for this bicycle has mostly already been described 
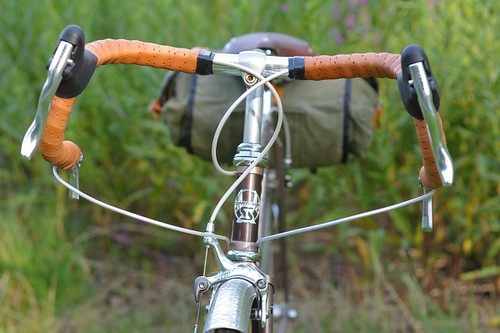
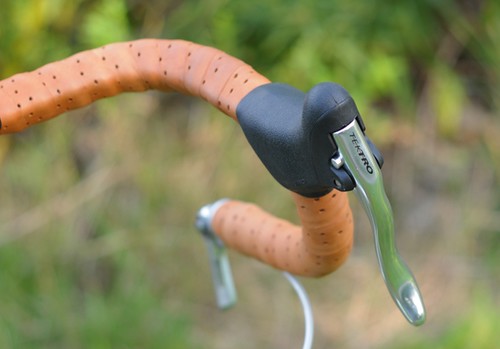
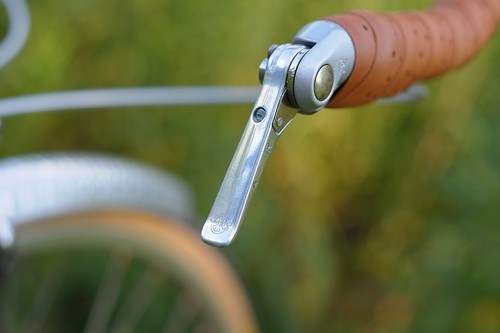
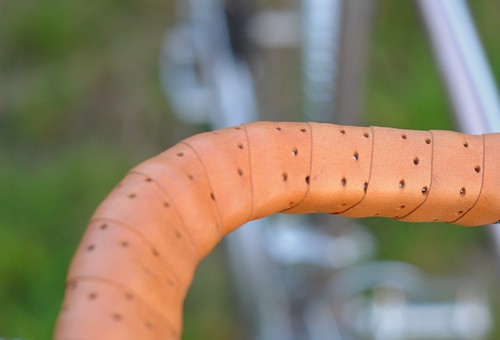
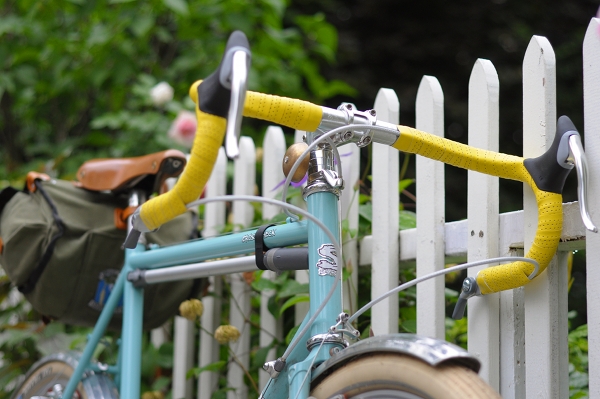
here, but a few changes have been made since then. The original shortish stem has been replaced with a 9cm stem, flipped upside down. The original yellow cloth tape got filthy and tattered fairly quickly, so we replaced it with Fizik tape. Initially, the cloth tape was supposed to be shellacked to a warm caramel - but the bright yellow looked so "right" on this bike, that it began to seem like an inherent part of its personality and he decided to keep it that way. He also added a frame pump, lamenting the lack of pump peg and using a strap to hold it in place.

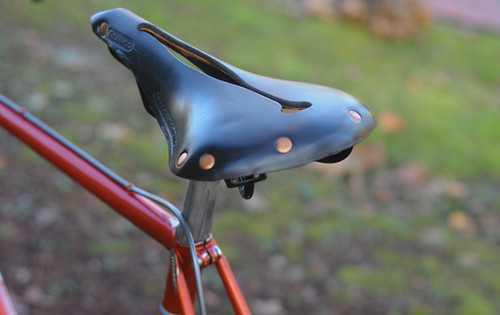
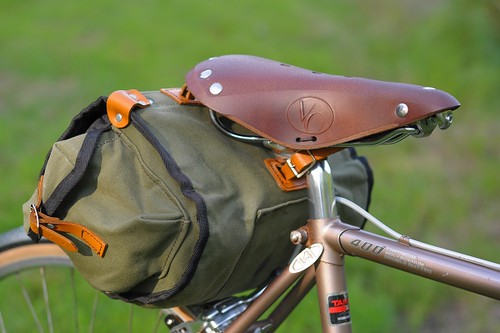
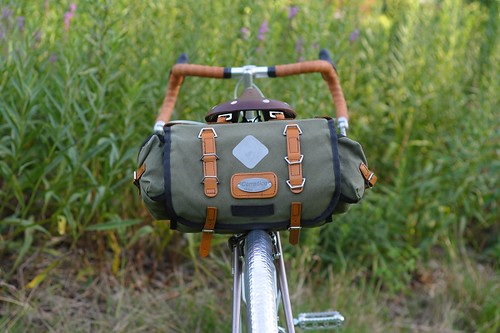
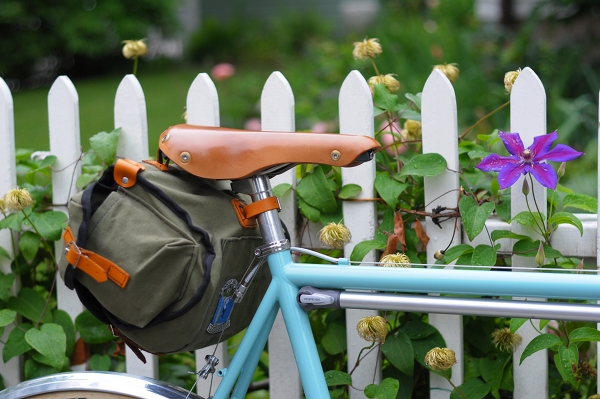
After two years in a lukewarm relationship with his Brooks Flyer saddle, he decided to sell it and replace it with a Berthoud touring saddle - the male version of the one I now have on my Rivendell. So far he loves it.

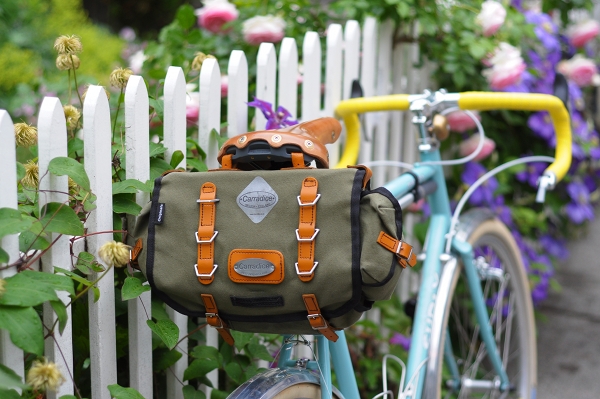
He fitted the bike with the Carradice bag that used to be on his old bike.

It now has a patch on it, to cover the tear that happened as a result of the bag rubbing over the brake cable on his old bike.
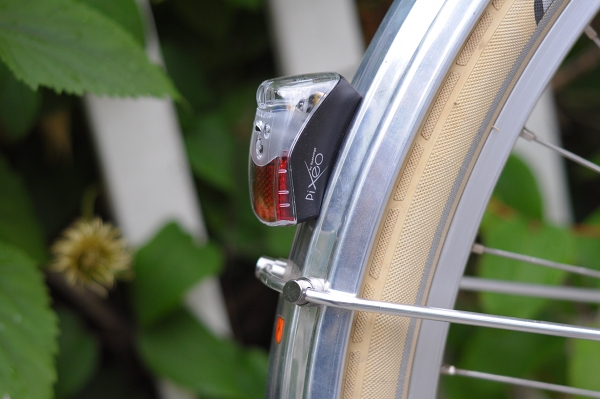
He affixed a CatEye headlight to a braze-on on the front fork, and a Spanninga Pixeo tail light to the rear fender.

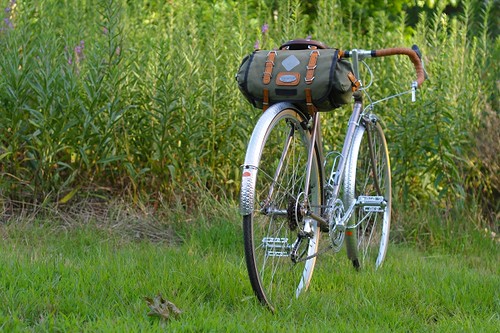
He tried to liberate himself from clipless pedals and rode the bike with touring pedals for a few weeks, but ultimately could not take it anymore and put his old clipless pedals back on. Fair enough, but this does limit the versatility he originally had in mind for the bike.
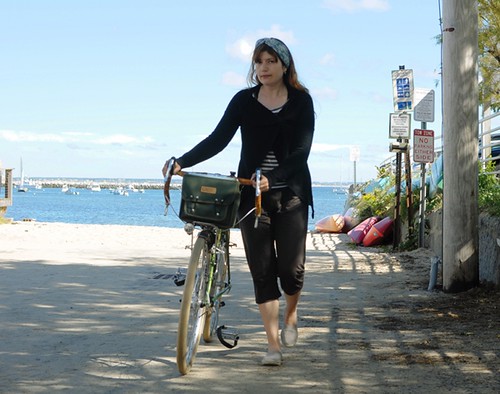
After riding the Surly Cross Check for two months, his main feedback is that the bike is faster than he expected - even with the wide tires and a bunch of weight in the saddlebag. While initially he intended to use the Cross Check in conjunction with his old Motobecane until he got his new roadbike, the Motobecane was retired as soon as he started riding the Surly - no need for it, since the Cross Check did everything it could do and more. He does not find the bike sluggish, and it seems that the tubing is just right for someone of his stature (6ft/ 200lb+). Overall, he is pretty happy. Though he likes lugs, he also likes a nicely done TIG-welded frame and the Surly suits him just fine.

My take on his Cross Check... I think it is a well-made, attractive frame for the price and I am glad that he finds it comfortable and fast. To be honest, I think that at least to some extent this build was not so much about practicality, as about doing a fun and challenging project using a bunch of components that we had acquired but had no use for. If the original purpose of the bike was off-road, then the tire+fender combo with such tight clearances does not really make sense. I have a feeling that he will end up using it mainly on the road, because I can't imagine him bothering to remove and reinstall the fenders every time he wants to take it on serious trails. And this means that when he gets his long-awaited road frame later this summer, the functionalities of the two bikes will overlap considerably. Not that there's anything wrong with that. But given how much he likes the Surly I am almost worried that he might be disappointed with the special bike he's waiting for. Well, hopefully not.

On a more general note, while the Cross Check is clearly versatile enough for commuting and touring, I wonder whether many cyclists actually use it for cyclocross racing. I have a hard time imagining that, given how relatively heavy it is - even the floor models with narrower tires and sportier components. But maybe I'm just biased from having handled too many lightweight bikes recently.

The Surly Cross Check is a fun bike with a cult following, and it is particularly impressive how customisable the frame is. With its happy colours, fat cream tires, elegant fenders and classic touring accessories, the Co-habitant's Cross Check is distinctly his own.